
The Resource Browser is used to add images and other resources to flipchart pages. You have 2 options for resource storage: "My Resources" & "Shared Resources". In either, you can create folders to store resources in a way you can quickly find and use them. When you find a resource, click the resource and drag it onto the flipchart page. (Click on images for larger views.)
Resource Browser Window

My Resources Shared Resources


To create Folders in Resource Browser (in Shared or My Resources)
1. Highlight where you want to create the folder
2. Click on the menu icon circled in pink below.
3. Click "Create New Folder"
4. Name the Folder and Click "OK"

To Expand Folders and Create New
5. Name the folder and Click "OK"
To add Resources
1. Go to My Resources
2. Select Folder (Expand with Plus + if necessary)
3. Highlight the folder you want to add resource to.


To use a Saved Resource
1. Find the Resource where you saved it
2. Click and drag the resource into your flipchart!
1. Highlight where you want to create the folder
2. Click on the menu icon circled in pink below.
3. Click "Create New Folder"
4. Name the Folder and Click "OK"

To Expand Folders and Create New
1. Click the plus (+) next to the folder and it will expand.
2. Highlight where you want to add a folder.
3. Click the menu icon
4. Select "Create New Folder"

5. Name the folder and Click "OK"
6. You will have to go back and highlight the folder you just created to add new images and resources to this folder.
To add Resources
1. Go to My Resources
2. Select Folder (Expand with Plus + if necessary)
3. Highlight the folder you want to add resource to.

4. I am saving the image of the apple in my flipchart for future use.
5. With the correct folder highlighted in "My Resources", drag the image into the area below the folder names.

6. You will still have the original image in the flipchart, but now a copy has been saved to "My Resources".

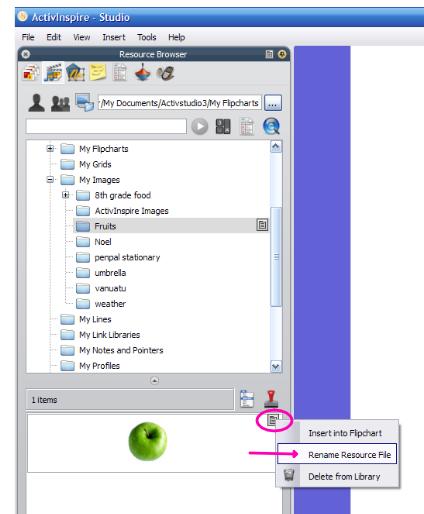
To Rename Resources
1. Click the Menu Icon next to image.
2. Select "Rename Resource File"
3. Enter new name and Click "Ok".
To use a Saved Resource
1. Find the Resource where you saved it
2. Click and drag the resource into your flipchart!
No comments:
Post a Comment