Wednesday, September 29, 2010

Object Browser

The Object Browser shows the layers and location of objects on a page. You can freely move objects between these layers. ActivInspire uses 4 layers: Top, Middle, Bottom and Background. By using layers, you can put objects on top of and under one another. Whatever is at the top will cover what is below. You can create interesting effects like pulling objects out of a hat! (Click on images for larger views.)


Object Browser Window and Layers


To move object between layers
1. Select object to be moved in Object Browser Window
2. Click and drag to new layer


3. Drop in new location. (Image may now be hidden behind something else.)


4. To pull images from behind, lock the top-most image. (To lock image, Right-click, and select "Locked".) Pull images out with the pen!

Saturday, September 25, 2010

Resource Browser

The Resource Browser is used to add images and other resources to flipchart pages.  You have 2 options for resource storage: "My Resources" & "Shared Resources".  In either, you can create folders to store resources in a way you can quickly find and use them.  When you find a resource, click the resource and drag it onto the flipchart page.  (Click on images for larger views.)

Resource Browser Window


My Resources                                                            Shared Resources

To create Folders in Resource Browser (in Shared or My Resources)
1.  Highlight where you want to create the folder
2.  Click on the menu icon circled in pink below.
3.  Click "Create New Folder"
4.  Name the Folder and Click "OK"


To Expand Folders and Create New
1.  Click the plus (+)  next to the folder and it will expand. 
2.  Highlight where you want to add a folder.
3.  Click the menu icon
4.  Select "Create New Folder"


5.  Name the folder and Click "OK"
6.  You will have to go back and highlight the folder you just created to add new images and resources to this folder.


To add Resources
1.  Go to My Resources
2.  Select Folder (Expand with Plus + if necessary)
3.  Highlight the folder you want to add resource to.


4. I am saving the image of the apple in my flipchart for future use.
5. With the correct folder highlighted in "My Resources", drag the image into the area below the folder names.

6.  You will still have the original image in the flipchart, but now a copy has been saved to "My Resources".

To Rename Resources
1.  Click the Menu Icon next to image.
2.  Select "Rename Resource File"
3.  Enter new name and Click "Ok".


To use a Saved Resource
1.  Find the Resource where you saved it
2.  Click and drag the resource into your flipchart!

Action: Drag a Copy


Drag a Copy: Drag a Copy enables you to drag an infinite number of copies of an object, leaving the original in its place. You can apply Drag a Copy to text or objects.  Some teaching uses for the Drag a Copy are to duplicate images of coins for counting activities or to create interactive game pieces.


1.  Select text or object to 'copy'.

2.  Right-click on object selected.


3.  Select "Drag a Copy" from the menu. (Shortcut = Ctrl+Shift+J)


Action: Extract Text


Actions are found on the "Action Browser".  


Extract Text: Extract Text enables you to click on any word in a text body and copy and paste (or extract) it quickly onto the same page.  You can apply Extract Text to text.  A teaching use for the Extract Text Action is to quickly identify parts of speech in sentences.  


1.  Select body of text. 

2.  Go to Action Browser:


 3. Scroll down and Select "Extract Text":


4.  Click "Apply Changes".

Action: Hidden

Click to Download Flipchart Example of Hidden Action

Actions are found on the "Action Browser".
(Click here for directions on locating Action Browser)

Hidden Action: Hidden Action allows you to click on one item and make another item appear.  You can apply the Hidden Action to images or text.  Some teaching uses for the Hidden Action are embedding correct answers to be shown with a click or for providing notes to be copied down in controlled sequence.

1.  Select object to be clicked.

2.  Go to Action Browser:


3.  Scroll down and Select "Hidden":


4.  Select "Target" (object to be shown) from menu:


5.  Click "Apply Changes".


Click Play below to watch a video on adding the Hidden Action to a flipchart page.
Or, Click here to open a larger view of the video in a new window.

Unable to display content. Adobe Flash is required.

Page Browser

The Page Browser is used to see all of the pages in your flipchart at once.  You can rearrange the order of pages by clicking and dragging.  You can delete or duplicate slides by Right-Clicking on a slide or using the Menu button.  Also, you can make the view in Page Browser smaller to see all pages at once by using the slide bar.

Page Browser Window

Page Browser Menu Button (or Right-Click on page)

Page Browser Slide Zoom Bar
Slide bar up to zoom out and see all pages at once.  This makes it easy to rearrange the order of the pages.

ActivInspire Browser Overview

Browsers are an important component to ActivInspire.  I have briefly defined each and its function below.

To see the browser window, go to any "View" menu and click "Browsers".  (Ctrl+B is the shortcut)


Page Browser:  Use to see all your pages in a flipchart.  You can copy and paste entire pages from here.  (more info on Page Browser)


Resource Browser:  Use to add images and other resources to pages in your flipcharts. (more info on Resource Browser)


Object Browser:  Use to move objects from one layer to another. (Top, Middle, Bottom & Background) (more info on Object Browser)


Notes Browser:  Use to include teaching notes to remember how to use each page in a flipchart.  (more info on Notes Browser)


Property Browser:  Use to change the individual properties of objects on a page. (more info on Property Browser)


Action Browser:  Use to add actions to individual objects on a page.  (more info on Action Browser)


Voting Browser:  Use to register and use ActiVotes and other tools, such as the ActivSlate. (more info on Voting Browser)

ActivInspire Camera Tool (Inside ActivInspire)

Using the camera to take pictures inside of ActivInspire.
(Click here learn to take pictures OUTSIDE of ActivInspire)


1.  Select the Camera Tool from the toolbar.  (Click on image to enlarge.)


2.  Select "Area Snapshot".  (You have other options:  "Point to Point Snapshot - you can capture around the image shape;  "Freehand Snapshot" - you can draw around an image shape; "Window Snapshot" - captures image of just ActivInspire window;  "Fullscreen Snapshot" - Captures everything on your screen at that time.)


3.  The screen will go gray leaving you with a highlight box to drag and reshape around image you want to capture.  

4.  When you are ready to capture the image, choose "Current Page" on "Camera Snapshot" Box that is on the screen.  This will add the image to the current page you are working on in ActivInspire.  (You have other options:  "New Page" - add image to new page; "Clipboard" - to use later; "My Resources" - to save as file; "Shared Resources" - to share as file.)


5.  The image will be on the same page to be resized and moved however you want! 


ActivInspire Camera Tool (Desktop Tools)

Using the camera to take pictures outside of ActivInspire.
(Click here to use the Camera Tool INSIDE ActivInspire)


1.  Find the image you want to capture.  (You can capture images from anywhere. From the web, from your documents...etc.)

2.  Go to ActivInspire and click on Desktop Tools, circled in pink below.  (Click on image for larger view.)

3.  ActivInspire will disappear leaving you with something like the image below. The Desktop Tools Icon will be on the screen.  (Click on image to enlarge.)


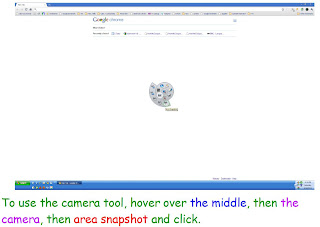
4.  Hover over the Desktop Tools Icon and it will expand.  Hover over the Camera Icon and it will expand once more.  Hover over the Area Snapshot Icon and click to use the tool. (Click on image to enlarge.)


5.  The screen will go gray.  Drag and reshape the area box around image you want to capture.


6.  When you are ready to capture the image, choose "Current Page" on "Camera Snapshot" Box that is on the screen.  This will add the image to the current page you are working on in ActivInspire.  (You have other options:  "New Page" - add image to new page; "Clipboard" - to use later; "My Resources" - to save as file; "Shared Resources" - to share as file.)


7.   You can take as many pictures as you would like, adding each to the current page.  When you are ready to go back to ActivInspire, click on "Return to Flipcharts" on the Desktop Tool Wheel.


8.  Your image(s) will be in your flipchart when you return.  Images can be resized and moved however you would like!