Click Play below to watch a video on adding the Hidden Action to a flipchart page.
Or, Click here to open a larger view of the video in a new window.

Quick tips on using technology in the classroom.
Sunday, October 24, 2010
Wednesday, October 20, 2010
Insert Link - Website
You can insert links into a flipchart so that you can go directly to different documents, mp3 files, video files or websites without opening another program. This helps to keep the continuity in your lessons.
Click here for how to Insert link to file.
To insert a website
Go to any 'Insert' menu, click on 'Link' and then on 'Website'.
(Click photos for larger views.)

Type in website and add the link to the page. You have 4 options.
1. You can add the link as text.
2. You can add the link as a default image.
3. You can add the link as a default action image.
4. Or, my favorite, you can attach the website link to an existing object. This lets you really customize the look of your flipcharts.

To attach a website to an existing object in your flipchart
This allows you to click an image and have a website magically open!
1. First, insert an image into the page that you would like to click for the website to open.
2. Then, go to any 'Insert' Menu, click 'Link', then 'Website'

3. Type in the website address.
4. Under 'Add link as' select 'Existing object', then click the (...) (#3 below)

5. Select the object you want to click from the menu and click 'OK'.

6. The object name will be inserted into the blank.
7. Click 'OK' to complete.

When you are in the flipchart page, your cursor will display a blue play button when you hover over the object to which you added the website link. Click the object and the website will open!
Thursday, October 7, 2010
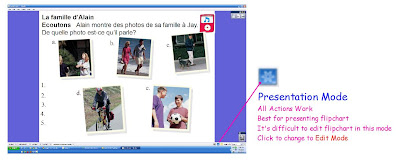
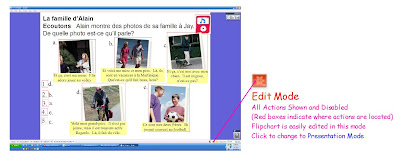
Design Mode: Presentation and Edit
ActivInspire can be used in two different modes: Presentation Mode and Edit Mode.
To change between Presentation Mode and Edit Mode, use the toggle button shown below:
BLUE for Presentation Mode:

RED for Edit Mode:

Click the button to toggle between the two modes as needed.
In Presentation Mode, all actions work, hidden items are hidden and locked items are locked. This is the mode you want to present your flipchart in.
In Edit Mode, all actions are disabled, everything hidden is shown and locked items are unlocked. All actions and hidden items are marked with a red box, as shown below. This is the mode you want to edit in because everything is visible and unlocked.
Again, when you are finished editing, you can click the button to go back to Presentation Mode and all actions will be enabled, hidden items will be hidden and locked items will be locked.
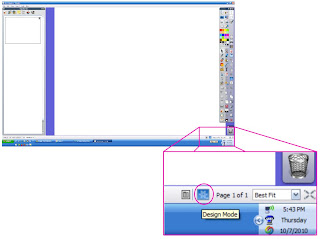
The button is small, so I've included a screen shot below to help you locate the button:
To change between Presentation Mode and Edit Mode, use the toggle button shown below:
BLUE for Presentation Mode:
RED for Edit Mode:

Click the button to toggle between the two modes as needed.
In Presentation Mode, all actions work, hidden items are hidden and locked items are locked. This is the mode you want to present your flipchart in.

In Edit Mode, all actions are disabled, everything hidden is shown and locked items are unlocked. All actions and hidden items are marked with a red box, as shown below. This is the mode you want to edit in because everything is visible and unlocked.

Again, when you are finished editing, you can click the button to go back to Presentation Mode and all actions will be enabled, hidden items will be hidden and locked items will be locked.
The button is small, so I've included a screen shot below to help you locate the button:

Monday, October 4, 2010
Magic Ink Reveal Tool
A Magic Ink Reveal Tool can be created once and used for a variety of lessons. The main thing to remember when using Magic Ink is that it only works on objects located in the Top Layer of the page.
To create a Magic Ink Reveal Tool
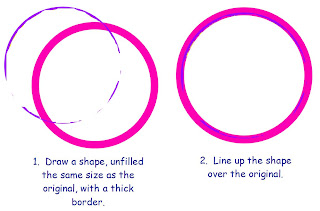
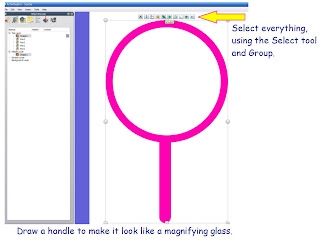
1. Draw a filled in shape with a thick border on the page. I will use a circle.
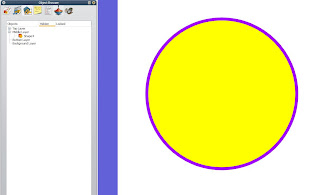
2. Move the shape to the Top Layer.
3. Use the Magic Ink to color in the shape. Get as close to the border as possible. This will become the inside of your Revealer Tool.

3. Draw another shape, but unfilled, around the Magic Ink. Line it up with the original shape. Make the border thicker than the original.
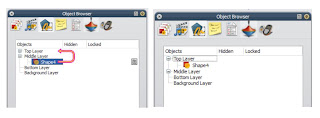
4. In the Object Browser Window, move this new, unfilled shape to the Top Layer, above the Magic Ink. (The other shape will disappear, hidden by this new shape.)
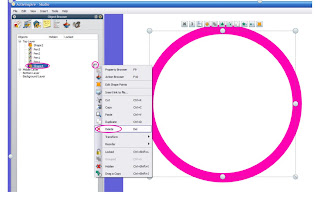
5. You don't need the original shape, so delete it using the Object Browser Window. Highlight the original shape, Click the Menu Icon, and select "Delete".
6. You now have a circle with the Magic Ink on the inside. To make it look like a Magnifying Glass, draw on a handle. Finally, select everything using the Select Tool and Group together. This makes it one image that can be moved around. Save the image in "My Resources" for future use.
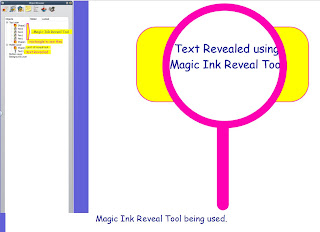
7. Magic Ink Reveal Tool in use
**Remember, the Magic Ink Reveal Tool ONLY works on objects located in the Top Layer. To "see through" objects, you must move them to the Top Layer using the Object Browser Window. Place what you want to see on the Middle or Bottom Layers.***
To create a Magic Ink Reveal Tool
1. Draw a filled in shape with a thick border on the page. I will use a circle.

2. Move the shape to the Top Layer.

3. Use the Magic Ink to color in the shape. Get as close to the border as possible. This will become the inside of your Revealer Tool.

3. Draw another shape, but unfilled, around the Magic Ink. Line it up with the original shape. Make the border thicker than the original.

4. In the Object Browser Window, move this new, unfilled shape to the Top Layer, above the Magic Ink. (The other shape will disappear, hidden by this new shape.)
5. You don't need the original shape, so delete it using the Object Browser Window. Highlight the original shape, Click the Menu Icon, and select "Delete".

6. You now have a circle with the Magic Ink on the inside. To make it look like a Magnifying Glass, draw on a handle. Finally, select everything using the Select Tool and Group together. This makes it one image that can be moved around. Save the image in "My Resources" for future use.

7. Magic Ink Reveal Tool in use

**Remember, the Magic Ink Reveal Tool ONLY works on objects located in the Top Layer. To "see through" objects, you must move them to the Top Layer using the Object Browser Window. Place what you want to see on the Middle or Bottom Layers.***
Magic Ink
Magic Ink can be used to 'see through' objects located in the Top Layer of a page. Magic Ink only works on objects located in the Top Layer of a page, so the images you want to 'see through' must also be located in the Top Layer. When you color with the Magic Ink over an object in the Top Layer, everything in the Middle and Bottom layers is revealed. (Click here to learn to make a Magnifying Glass Magic Ink Reveal Tool)
To see the layers of your page, use the Object Browser Window. (Click here for help finding the Object Browser Window.)
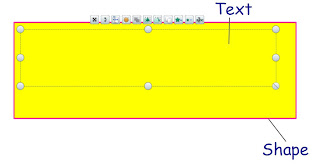
You will need 2 objects for this tutorial. I will use a rectangle and text. The Magic Ink will be used to 'see through' the rectangle to the text.
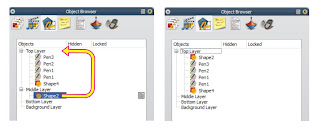
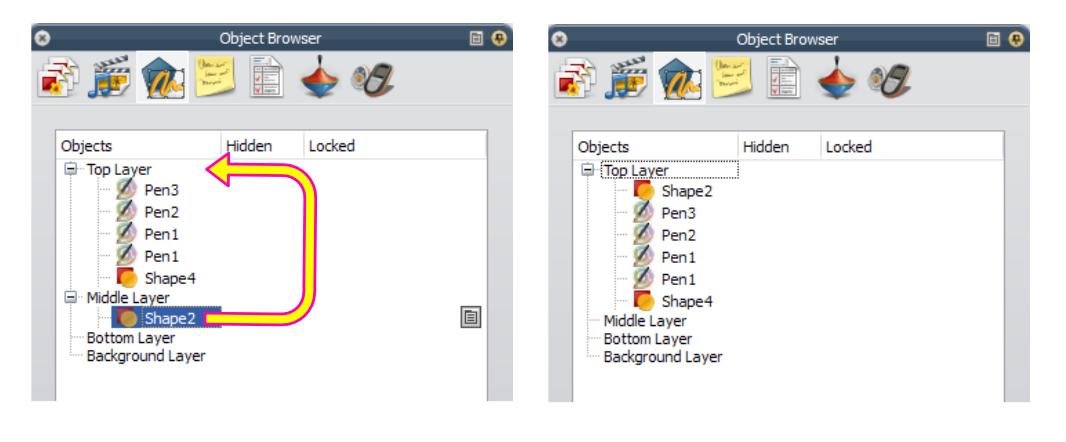
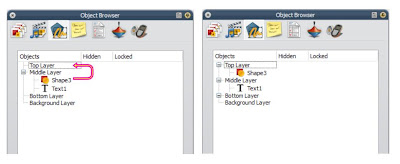
1. Objects (shapes, images and text) default to the Middle Layer. Since Magic Ink only works on objects in the Top Layer, you must first move the shape to the Top Layer by dragging and dropping it in the Object Browser Window. (Click on images for larger views.)
2. In the workspace, place the shape over the text.
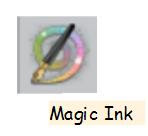
3. Click on the Magic Ink Tool.
4. Using Magic Ink, color over the rectangle and the text will appear!

This is an interesting way for students to discover answers or helpful hints during a lesson.
To see the layers of your page, use the Object Browser Window. (Click here for help finding the Object Browser Window.)
You will need 2 objects for this tutorial. I will use a rectangle and text. The Magic Ink will be used to 'see through' the rectangle to the text.
1. Objects (shapes, images and text) default to the Middle Layer. Since Magic Ink only works on objects in the Top Layer, you must first move the shape to the Top Layer by dragging and dropping it in the Object Browser Window. (Click on images for larger views.)

2. In the workspace, place the shape over the text.

3. Click on the Magic Ink Tool.
4. Using Magic Ink, color over the rectangle and the text will appear!

This is an interesting way for students to discover answers or helpful hints during a lesson.
Sunday, October 3, 2010
Profile and Toolbar Setup
A good first step in using ActivInspire is to set up your profile, which includes customizing your toolbar. This way, when you are creating flipcharts, the tools you regularly use are easy to locate.
Click here to see ActivInspire Tools with Descriptions
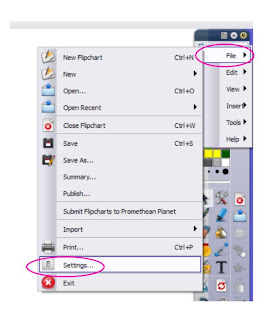
To setup your toolbar and profile, go to File, Settings.
A window similar to the ones below will open.
Profile
Select the drop down menu at the top left. Here you will find preset Profiles. I use 'Authoring' because it includes a larger variety of tools for editing and creating flipcharts. When you click on each profile, ActivInspire will change it's look. Click on each to choose the one that you prefer. The toolbar can still be customized after you choose a profile.

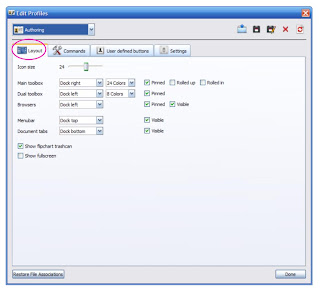
Layout
Select the "Layout" tab to change a variety of layout features, including number of colors shown in toolbar, size of icons on toolbar and whether to show the flipchart trashcan.
Commands
-Select the "Commands" tab to add or remove TOOLS from your toolbar.
-The tools listed on the left are those NOT on your toolbar. The tools listed on the right are currently on your toolbar. (You can scroll up and down in either list to see them all.)
-Add the tools you often use, and remove the tools you never use so that your workspace is more functional.
-To add a tool, select the tool from the list on the left and click "Add".
-To remove a tool, select the tool from the list on the right and click "Remove".
-To move tools on the toolbar, use the "Move Up" and "Move Down" buttons.
-Click here to see tools and descriptions
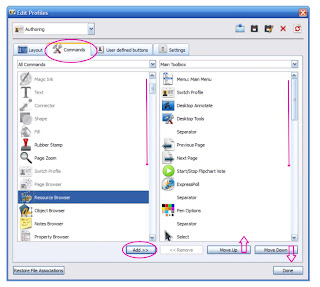
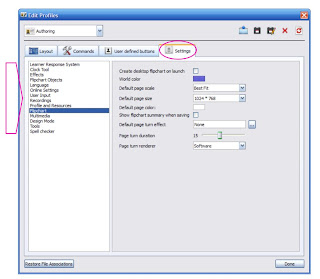
Settings
Select the "Settings" tab to customize a variety of different things in ActivInspire, including the Clock Tool, the color of the Revealer Tool and Background, the Spell checker, and the settings for Learner Response Systems.
User defined buttons (Advanced)
Use this to create your own quick buttons to use in the program. The buttons will be added to your toolbar.
Click here to see ActivInspire Tools with Descriptions
To setup your toolbar and profile, go to File, Settings.

A window similar to the ones below will open.
Profile
Select the drop down menu at the top left. Here you will find preset Profiles. I use 'Authoring' because it includes a larger variety of tools for editing and creating flipcharts. When you click on each profile, ActivInspire will change it's look. Click on each to choose the one that you prefer. The toolbar can still be customized after you choose a profile.

Layout
Select the "Layout" tab to change a variety of layout features, including number of colors shown in toolbar, size of icons on toolbar and whether to show the flipchart trashcan.

Commands
-Select the "Commands" tab to add or remove TOOLS from your toolbar.
-The tools listed on the left are those NOT on your toolbar. The tools listed on the right are currently on your toolbar. (You can scroll up and down in either list to see them all.)
-Add the tools you often use, and remove the tools you never use so that your workspace is more functional.
-To add a tool, select the tool from the list on the left and click "Add".
-To remove a tool, select the tool from the list on the right and click "Remove".
-To move tools on the toolbar, use the "Move Up" and "Move Down" buttons.
-Click here to see tools and descriptions

Settings
Select the "Settings" tab to customize a variety of different things in ActivInspire, including the Clock Tool, the color of the Revealer Tool and Background, the Spell checker, and the settings for Learner Response Systems.

User defined buttons (Advanced)
Use this to create your own quick buttons to use in the program. The buttons will be added to your toolbar.
Voting Browser
The Voting Browser is used to register ActiVotes and other accessories. Use this browser when using ActiVotes in the classroom.
Voting Browser Window
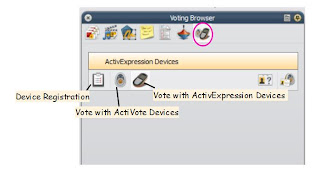
Voting Browser Window

Action Browser
The Action Browser allows you to add actions to individual objects within a page. An example of an action is when you click on one item to make another item appear in the flipchart. Adding actions to a flipchart is an easy way to make your lessons more interactive. Also, actions help to control the pace of the lesson by allowing you to include hidden answers and information that can appear by the click of your pen. (Click images for larger views.)
Action Browser Window
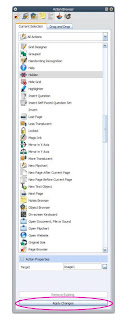
Select the object in the flipchart page that you want to add an action to. (This will be the object clicked.) Then, click on the Action Browser icon to find an action to add. You will have many options. Scroll down using the bar on the right to see them all.

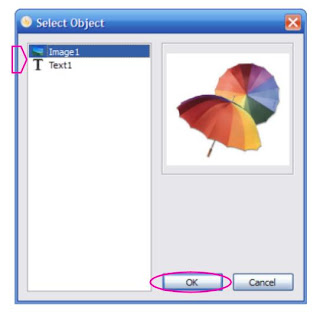
When you find the action you want to add, click on it. You will be prompted at the bottom of the Action Browser Window to select a "Target". (This is the item that the action will be performed on, NOT clicked.)
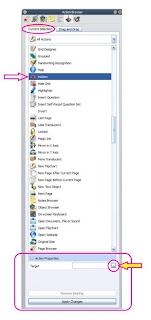
Click the (...) in the box to the right of "Target" and the window below will open. Select the object you want the action to happen to from the list, highlight it and click "OK".
Always click "Apply Changes" button at the bottom of the Action Browser Window to save the action to the object.
I always test out the action by clicking on the object in the flipchart page. (The object will have a blue play button next to the cursor, indicating there is an action for that object.)
Action Categories
When displaying actions available, you can limit those shown by category. ("All Actions" displays every action that is available.)

Drag and Drop Actions
To add Actions directly to the page without adding it to a specific object, use the Drag and Drop Actions. These will display their own icons on the page. Click and hold the Action you want to add, then drag to the flipchart page and drop.

Action Browser Window
Select the object in the flipchart page that you want to add an action to. (This will be the object clicked.) Then, click on the Action Browser icon to find an action to add. You will have many options. Scroll down using the bar on the right to see them all.

When you find the action you want to add, click on it. You will be prompted at the bottom of the Action Browser Window to select a "Target". (This is the item that the action will be performed on, NOT clicked.)

Click the (...) in the box to the right of "Target" and the window below will open. Select the object you want the action to happen to from the list, highlight it and click "OK".

Always click "Apply Changes" button at the bottom of the Action Browser Window to save the action to the object.

I always test out the action by clicking on the object in the flipchart page. (The object will have a blue play button next to the cursor, indicating there is an action for that object.)
Action Categories
When displaying actions available, you can limit those shown by category. ("All Actions" displays every action that is available.)
Drag and Drop Actions
To add Actions directly to the page without adding it to a specific object, use the Drag and Drop Actions. These will display their own icons on the page. Click and hold the Action you want to add, then drag to the flipchart page and drop.

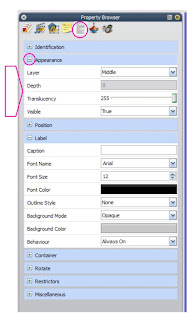
Property Browser
The Property Browser displays all of the properties an individual object can possess. This browser provides a very detailed list of everything you can change about an object. This is also where you create Containers and Restrictors.
Property Browser Window
Click on plus (+) signs to expand each section. (Sections available will change depending on what is selected in the flipchart page.)
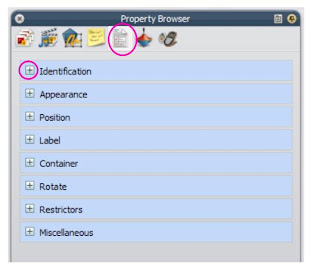
When the section is expanded, you can make changes using the drop down boxes and text entry fields.
Property Browser Window
Click on plus (+) signs to expand each section. (Sections available will change depending on what is selected in the flipchart page.)

When the section is expanded, you can make changes using the drop down boxes and text entry fields.

Notes Browser
The Notes Browser allows you to type in directions to yourself and other teachers on how to use each of the pages in a flipchart. You can remind yourself to click on items to make other items appear or how to teach the lesson.
Notes Browser Window

Notes Browser Window

Subscribe to:
Posts (Atom)