Sunday, December 12, 2010

Shape Tool - Adding Shapes in ActivInspire

Shapes, when filled with a color or as an outline only, can be used to create emphasis in a lesson.  Filled shapes can be used to cover answers and unfilled shapes can be used to highlight important information.


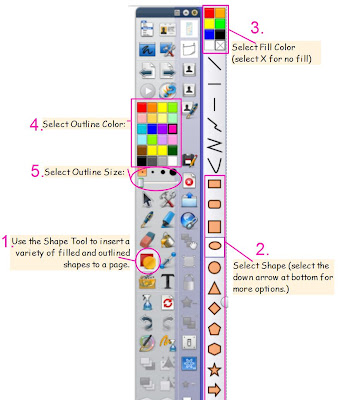
Shape Tool on the Toolbar


To create shapes (Click on image for larger view.)
     Step 1 - Select the Shape Tool (as shown above)
     Step 2 - Select the desired shape
     Step 3 - Select the fill color (the color of the inside of the shape.) If you only want an outline of a shape, select the X.
     Step 4 - Select the outline color
     Step 5 - Select the outine size


When you have selected all of the properties for your shape, draw the shape onto a page. To draw a shape, click and hold the mouse.  When you are happy with the shape, let go of the mouse click.  Practice adding a variety of shapes, filled and outline only.

Text Tool - Typing in ActivInspire

Text is often the basic element in a lesson.  But, by using the capabilities of ActivInspire, the text does not have to be boring.  After you learn to enter text into a page, you can manipulate it in a variety of ways.  Each text box can be easily moved around the page or highlighted using the paint bucket.  Also, you can attach actions to text to make note-taking and textbook exercises more engaging!

Text Tool from the toolbar
Typing text
Text is added to a Text Box.  Each text box can be moved and manipulated as an object.  I've found that it is best to use multiple text boxes within a page so that I can rearrange and change each piece of text to add variety and interest to a lesson.  Practice adding several text boxes to a page.  Just click in a new area in a page to add additional text boxes.

Changing Font and Text Size
The Text Tool bar, (shown below) allows you to change the text just as you would in other programs.   Highlight the text to be changed and use the tool bar to select a new font, a larger size, bold, italic or underline.


Moving Text Boxes 
When you have completed typing in text, use the Select Tool (shown below) to move the text boxes around the page.

Getting Started With ActivInspire

Getting started with ActivInspire can be overwhelming.  There are a few steps you can take to become more comfortable with the basics.  Soon, you will be creating interactive flipcharts to engage students in any classroom!

1.  Set up your Profile and Tool Bar
The first step to start using ActivInspire is to set up your Profile and Toolbar.  By setting these up, you will have the tools you use most when creating flipcharts readily available.  This can be updated and changed as you learn which tools you use most.

Click here to see Tool Descriptions and Uses.

2.  After you set up your Profile and Select tools for your toolbar, start adding elements to a page.

Add Text
Add Shapes
Add Pictures from the web using the Camera Tool
Add Website Links

ActivInspire Tools with Descriptions

Below is a brief overview of the some of the Tools and Commands available in ActivInspire.  (Click on images for larger views.)

Basic Tools with Descriptions (Click to enlarge)


Math Tools

Keyboard, Calculator, and Clock

Dice and TickerTape

To make things 'Magically' appear and disappear (Click here to learn to use Magic Ink)

To reset page to last saved version

To record and control sounds


ActivVote Tools

To use two pens at a time

To Insert Blank Pages into a Flipchart


To clear a page


To move objects between layers 


 To move objects within a layer


To Align objects on a Flipchart Page

To reveal only a part of the screen when presenting

Menu Icons


To use ActivInspire Tools over the Desktop


Monday, November 8, 2010

Resource Packs - Downloading and Importing

You can download lots of great and helpful resources for use with ActivInspire from www.prometheanplanet.com. To download resources for free, you will need to register and login on the website.

From this website, you can download Resource Packs, which are collections of images and objects grouped by theme.  It is a 2-step process be able to use Resource Packs: First, you download the Resource Pack from the website.  Then, you import it into ActivInpsire for use.

Below are instructions for Registering on Promethean Planet, Downloading a Resource Pack, Importing a Resource Pack and Locating and Using a Resource Pack.  (Click on images for larger views.)

To Register on Promethean Planet:
Go to www.prometheanplanet.com.  If you do not have a login, register using the Register tab at the top of the screen.  Fill in the required information and Click "Register Now".


To Download a Resource Pack:
1. Sign in on www.prometheanplanet.com in order to download resources for free.  
2. Hover over the "Resources" Tab at the top of the webpage.  When you hover over "Resources", it will show you the search options.  Select "Resource Packs". 


3.  Input search topic and filters to find exactly what you are looking for.

4.  I searched for "France".  Once you find a Resource Pack that you are interested in, click on the name.  I selected "France Backgrounds".


5.  You can review the Resource Pack on the left.  Once you decide you want it, click "Download".  It will prompt you to save the Resource Pack on your computer.  Save it somewhere you will be able to easily locate it later.  For example, I created a folder on my desktop named "Resource Packs" where I save all resource packs that I download.


6. You are now done using the website.  But, to be able to use the elements inside the Resource Pack, you must next import the Resource Pack into ActivInspire.

To Import Resource Pack into ActivInspire
1.  Open ActivInspire.  Go to any File Menu.  Select "Import".  Select "Resource Pack to My Resources". 

2.  Locate the Resource Pack that you previously downloaded from the Promethean website.  Highlight the Resource Pack to Open.  Click "Open"..


3.  You have now imported the Resource Pack.  Now you need to be able to find and use it! 

To Locate and Use Resource Packs imported into My Resources
1.  Go to Resource Browser. (Where is the Resource Browser?)
2.  Select "My Resources" (the silhouette of one person)
3.  Scroll down to find "Resource Packs"
4.  click on (+) to expand "Resource Packs"
5.  Click on Resource Pack you downloaded.
6.  View the images and select what you will use! 

Sunday, October 24, 2010

Video Tutorial - Hidden Text

Click Play below to watch a video on adding the Hidden Action to a flipchart page.
Or, Click here to open a larger view of the video in a new window.

Unable to display content. Adobe Flash is required.

Wednesday, October 20, 2010

Insert Link - Website

You can insert links into a flipchart so that you can go directly to different documents, mp3 files, video files or websites without opening another program. This helps to keep the continuity in your lessons.

Click here for how to Insert link to file.

To insert a website
Go to any 'Insert' menu, click on 'Link' and then on 'Website'.
(Click photos for larger views.)


Type in website and add the link to the page. You have 4 options.
1. You can add the link as text.
2. You can add the link as a default image.
3. You can add the link as a default action image.
4. Or, my favorite, you can attach the website link to an existing object. This lets you really customize the look of your flipcharts.


To attach a website to an existing object in your flipchart
This allows you to click an image and have a website magically open!
1. First, insert an image into the page that you would like to click for the website to open.
2. Then, go to any 'Insert' Menu, click 'Link', then 'Website'


3. Type in the website address.
4. Under 'Add link as' select 'Existing object', then click the (...) (#3 below)


5. Select the object you want to click from the menu and click 'OK'.


6. The object name will be inserted into the blank.
7. Click 'OK' to complete.


When you are in the flipchart page, your cursor will display a blue play button when you hover over the object to which you added the website link. Click the object and the website will open!

Thursday, October 7, 2010

Design Mode: Presentation and Edit

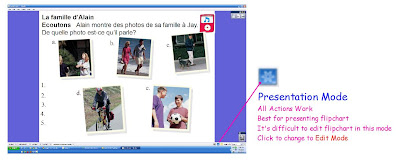
ActivInspire can be used in two different modes: Presentation Mode and Edit Mode.

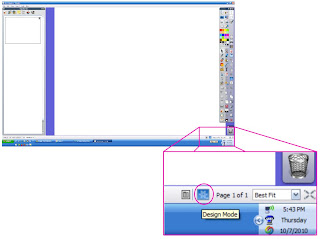
To change between Presentation Mode and Edit Mode, use the toggle button shown below:

BLUE for Presentation Mode:


RED for Edit Mode:


Click the button to toggle between the two modes as needed.

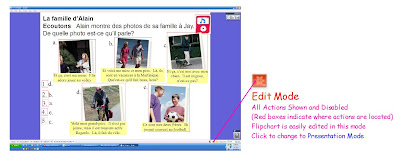
In Presentation Mode, all actions work, hidden items are hidden and locked items are locked. This is the mode you want to present your flipchart in.


In Edit Mode, all actions are disabled, everything hidden is shown and locked items are unlocked. All actions and hidden items are marked with a red box, as shown below. This is the mode you want to edit in because everything is visible and unlocked.


Again, when you are finished editing, you can click the button to go back to Presentation Mode and all actions will be enabled, hidden items will be hidden and locked items will be locked.

The button is small, so I've included a screen shot below to help you locate the button:

Monday, October 4, 2010

Magic Ink Reveal Tool

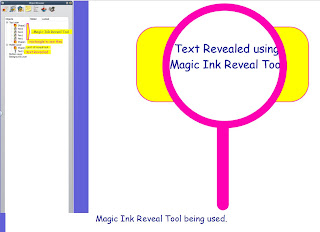
A Magic Ink Reveal Tool can be created once and used for a variety of lessons. The main thing to remember when using Magic Ink is that it only works on objects located in the Top Layer of the page.

To create a Magic Ink Reveal Tool

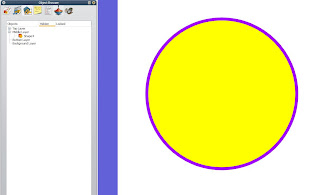
1. Draw a filled in shape with a thick border on the page. I will use a circle.


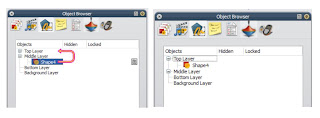
2. Move the shape to the Top Layer.


3. Use the Magic Ink to color in the shape. Get as close to the border as possible. This will become the inside of your Revealer Tool.


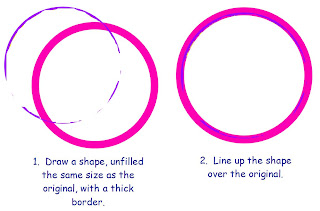
3. Draw another shape, but unfilled, around the Magic Ink. Line it up with the original shape. Make the border thicker than the original.


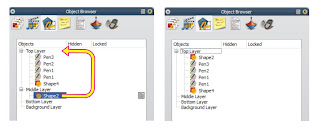
4. In the Object Browser Window, move this new, unfilled shape to the Top Layer, above the Magic Ink. (The other shape will disappear, hidden by this new shape.)


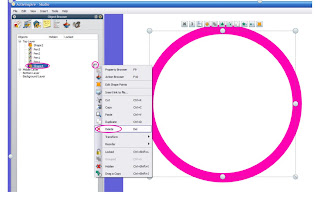
5. You don't need the original shape, so delete it using the Object Browser Window. Highlight the original shape, Click the Menu Icon, and select "Delete".


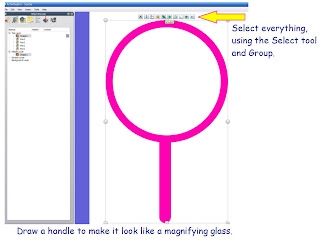
6. You now have a circle with the Magic Ink on the inside. To make it look like a Magnifying Glass, draw on a handle. Finally, select everything using the Select Tool and Group together. This makes it one image that can be moved around. Save the image in "My Resources" for future use.


7. Magic Ink Reveal Tool in use


**Remember, the Magic Ink Reveal Tool ONLY works on objects located in the Top Layer. To "see through" objects, you must move them to the Top Layer using the Object Browser Window. Place what you want to see on the Middle or Bottom Layers.***